Contents10
- The short answer — break it into four layers and clear one at a time
- Glossary: SSG and Jamstack — the assumptions this roadmap rests on
- Step 1 — Develop and write the VuePress project locally
- Step 2 — Create a GitHub repo and push the source
- Step 3 — Connect the repo to Netlify and let it auto-build
- Step 4 — Buy a custom domain on Onamae.com
- Step 5 — Wire Netlify and Onamae.com together by delegating nameservers
- Comparison table — the 2021 VuePress setup vs. the 2026 Astro setup
- FAQ
- Closing
2026 update: A post ported from the old VuePress blog. The procedural screenshots are from 2021, and the Netlify / Onamae.com UI has shifted since. VuePress 1.x itself isn’t suited to greenfield builds anymore, so the body has been rewritten in two layers: “a 2021 build record” and “the four-layer roadmap you can still reuse”.
In 2021, Aulvem’s precursor blog was built on VuePress 1.x, with the source kept on GitHub, builds and delivery handled by Netlify, and a custom domain bought through Onamae.com pointed at the whole thing. I worked through it while reading the usual “publish a blog for free” articles, but it took a while before the big picture of “what was happening where” clicked for me.
This post leads with the thing my past self would have wanted first: the overall roadmap and the responsibility of each step. VuePress 1.x isn’t a serious option for new builds anymore, but the roadmap itself ports cleanly over to an Astro + Cloudflare Pages setup.
The VuePress directory layout itself is split out into a separate post (VuePress/blog directory structure — a 2021 build note). This one focuses on “the sequence of getting the whole site published”, not “the contents of individual files”.
The short answer — break it into four layers and clear one at a time
Short answer: the fastest way to get a VuePress blog live on a custom domain is to break the work into four layers — (1) local dev, (2) put the source on GitHub, (3) let Netlify auto-build and serve it, (4) delegate the Onamae.com nameservers to Netlify — and clear them one by one.
The reason is separation of concerns. Cramming everything into one service makes it hard to tell where a failure occurred. Putting “write”, “store”, “build”, and “publish” on separate layers makes triage easier when something breaks.
The whole picture looks like this.
[Local PC]
   │ git push
   ▼
[GitHub] ──── source of truth
   │ webhook
   ▼
[Netlify] ──── build & static delivery (xxx.netlify.app)
   │ DNS (nameserver delegation)
   ▼
[Onamae.com domain]
   │ served on the custom domain
   ▼
[Readers]
A caveat: these four layers aren’t VuePress-specific. Astro, Hugo, or any other SSG that converts Markdown to static HTML and serves it lines up the same way. The VuePress-specific parts only show up in the build commands of (1) and (3).
Glossary: SSG and Jamstack — the assumptions this roadmap rests on
SSG (Static Site Generator): A generic term for tools that convert Markdown or JSON to static HTML at build time. VuePress, Astro, Next.js (output:static), Hugo, and Jekyll all qualify. It pairs against the CMS pattern (WordPress and friends) where the server assembles the page dynamically per request.
Jamstack: An acronym from JavaScript / APIs / Markup (pre-built static files). It refers to a setup where SSG-generated HTML sits on a CDN and any dynamic logic is supplied by external APIs. Netlify is hosting designed around this Jamstack assumption.
This roadmap only works because the output is “just static files”. The simplicity of “put the source on GitHub, let Netlify rebuild it and push it to a CDN” leans on the Jamstack premise.
Step 1 — Develop and write the VuePress project locally
Short answer: in the local-development phase, write Markdown and Vue components with hot-reload via vuepress dev src.
The reason is iteration speed. Fixing things locally is an order of magnitude faster than redeploying. Build times were short too, so an “edit while you write” workflow was realistic.
Concretely, I developed against this layout.
src
├─ _posts                   Markdown for each article
│  └─ category
│     └─ page.md
└─ .vuepress
   ├─ components            Article-side components (Vue)
   ├─ public                images and robots.txt
   ├─ theme                 layouts / components / styles
   ├─ config.js             VuePress core configuration
   └─ enhanceApp.js         Vue plugin entry point
A two-way split: _posts/ for articles, .vuepress/ for framework configuration and theme. The details are in VuePress/blog directory structure.
A caveat: during development, vuepress dev src --host 0.0.0.0 --port 8080 lets you open the site from another device on the LAN to check the phone view. Markdown layouts tend to get sloppy if you only ever look at them on a desktop.
Step 2 — Create a GitHub repo and push the source
Short answer: in the “push to GitHub” phase, create an empty repo, then push only the source from local with git remote add and git push -u origin main.
The reason is separating source from build output. Committing dist/ or node_modules/ bloats history and undermines the whole point of letting Netlify rebuild on its side.
Concretely, I excluded the following via .gitignore.
node_modules/
src/.vuepress/dist/
src/.vuepress/.cache/
src/.vuepress/.temp/
.env
.env.local
Netlify rebuilds the build output every time, so the repository only needs src/ and package.json / package-lock.json.
A caveat: if you’re going public, don’t accidentally commit API keys or access tokens. At the time I went back and forth on whether to put secrets in GitHub Secrets or Netlify environment variables — the conclusion I landed on was “values only used at build time go on the Netlify side, and anything that could leak at runtime shouldn’t exist at all”.
Step 3 — Connect the repo to Netlify and let it auto-build
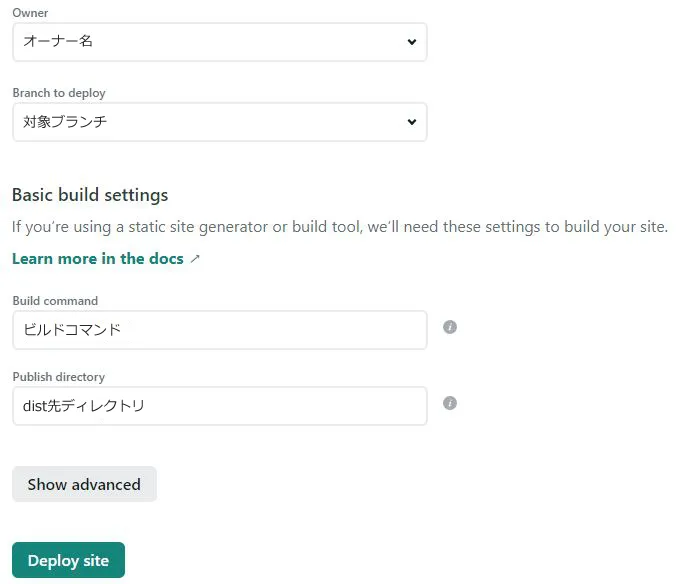
Short answer: in the Netlify connection phase, go through Add new site → Import an existing project, pick the GitHub repo, and fill in the build command and publish directory.
The reason is webhook-driven automation. Netlify detects each git push to GitHub and re-runs vuepress build against the latest source. The old “manual npm run build then FTP to a server” flow disappears entirely.
The concrete settings were these.
| Setting | Value |
|---|---|
| Branch to deploy | main |
| Build command | vuepress build src |
| Publish directory | src/.vuepress/dist |
| Node.js version | 14.x (pinned via the NODE_VERSION env var) |
After signing into Netlify, the flow looked roughly like this (UI as of 2021).

Once you pick the repository, enter vuepress build src and src/.vuepress/dist in the build settings and the deploy kicks off.
A caveat: the first build often fails because of Node version mismatches. Pinning NODE_VERSION to something like 14, or dropping a .nvmrc at the repo root, cuts the accident rate. The detailed walkthrough lives in Deploying a VuePress / static site to Netlify.
Step 4 — Buy a custom domain on Onamae.com
Short answer: in the domain-purchase phase, search for the domain name you want, pick “do not use” for the server option, and check out. There’s no need to bundle a server contract.
The reason is separation of concerns. Onamae.com’s job is “owning the domain”; hosting is Netlify’s job. You’ll usually be guided into bundling a server contract, but a Jamstack setup doesn’t need one.
The actual screen looked like this.

At the server selection step, pick “do not use” and proceed.
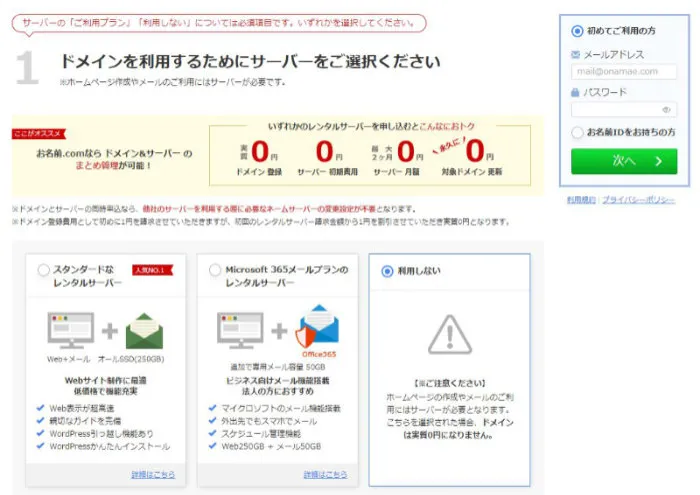
A caveat: always enable Whois privacy within its free tier — it keeps your personal information off the public Whois record. Renewal fees can be higher than the initial registration on some TLDs, so for long-term operation a standard TLD like .com / .net reads better later on.
Step 5 — Wire Netlify and Onamae.com together by delegating nameservers
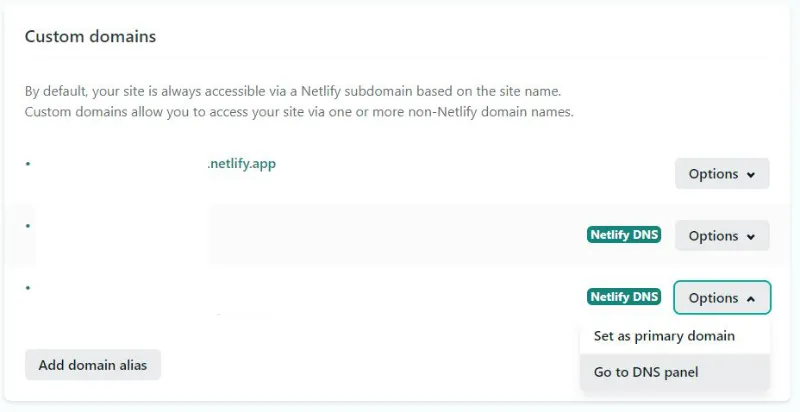
Short answer: in the nameserver-delegation phase, on the Netlify side go through Add custom domain → Set up Netlify DNS, and paste the four nameservers it shows you into “Change nameservers” in Onamae.com Navi.
The reason is to centralize DNS management on Netlify. Once you delegate nameservers, Netlify takes over A / CNAME records and SSL certificate issuance (Let’s Encrypt). You no longer have to write records yourself on the Onamae.com side.
Open Domain settings from Netlify’s overview page.
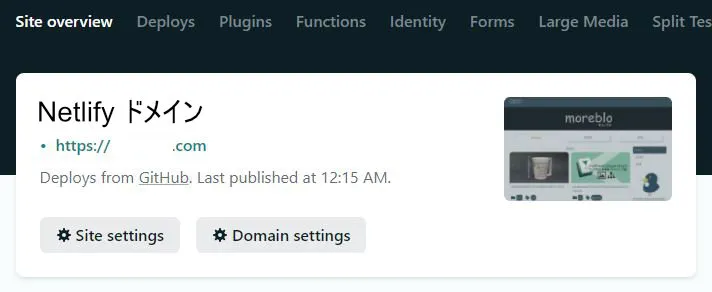
Step through Add custom domain and you’ll eventually see the four assigned nameservers.
Sign in to Onamae.com Navi, open “Change nameservers” for the target domain, pick “use other nameservers”, and paste the four you noted down.
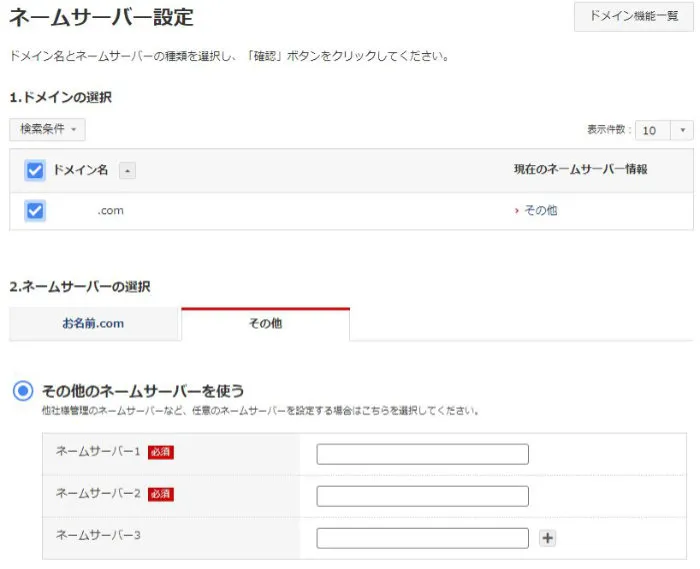
Propagation takes anywhere from a few minutes to about 48 hours. If the custom domain still doesn’t resolve after half a day, try accessing from a different network (mobile data, for example) to rule out DNS caching. The detailed caveats are split into Connecting an Onamae.com custom domain to Netlify.
A caveat: once you’ve delegated, stop touching Onamae.com’s DNS records screen. Netlify DNS is now the source of truth, so subdomain additions and MX records for email should all happen in Netlify’s DNS Records UI.
Comparison table — the 2021 VuePress setup vs. the 2026 Astro setup
The roadmap itself hasn’t changed, but the tools at each layer have rotated over the past five years. Aulvem itself has moved from VuePress to Astro.
| Layer | 2021: VuePress setup | 2026: Astro setup (current Aulvem) |
|---|---|---|
| Local dev | VuePress 1.x + Node 14.x | Astro 5 + Node 20.x |
| Article schema | frontmatter (untyped) | content collections + zod schema |
| Git hosting | GitHub | GitHub |
| CI / build & delivery | Netlify | Cloudflare Pages |
| Domain registrar | Onamae.com | Onamae.com or Cloudflare Registrar |
| DNS management | Netlify DNS | Cloudflare DNS |
| SSL certificate | Let’s Encrypt (auto-issued by Netlify) | Cloudflare-issued automatically |
| Image delivery | served straight from Netlify | Cloudflare R2 + image optimization |
The point isn’t that the newer side is “better” — it’s that the four-layer roadmap is unchanged and you only swap in different implementations per layer. The VuePress-to-Astro migration also progressed by carving things up layer-by-layer and replacing one at a time.
A caveat: Netlify is still a valid choice in 2026, and if you’re leaning on its own features like Forms / Identity / Edge Functions it’s still a top pick. Which beats which between Netlify and Cloudflare Pages depends on the use case.
FAQ
Q. Is there any point in starting a blog on VuePress 1.x today? A. I wouldn’t recommend it as a first pick for a new blog. VuePress 1.x is effectively unmaintained, so timely vulnerability patches in dependencies are unlikely. For a Markdown-centric static blog, Astro + content collections or VitePress is a better return on your learning time. If you have a personal reason to stay on Vue, VitePress is the candidate to look at.
Q. Do GitHub and Netlify really need to be split? A. Generally yes. GitHub is the source of truth for source code; Netlify is the delivery layer for built HTML — different responsibilities, so if one goes down the other survives. Some services like GitHub Pages or Cloudflare Pages combine both, and in those cases it’s fine to centralize. The Pages-style options come with constraints on CI customization, though, so if you want fine-grained control over the build pipeline, splitting them is easier.
Q. Can you still publish if you put off buying the domain?
A. Yes. Netlify hands out a free xxx.netlify.app subdomain, so you can build and review content before paying for a custom domain. In practice, switching the domain over last is the safer order. Less chance of accidents that way than buying the domain first and then sitting on a long wait while you try to make the site work.
Q. If I were to build this in 2026, what would I swap in? A. My personal swap is VuePress to Astro, Netlify to Cloudflare Pages, and Onamae.com staying as-is (or moving to Cloudflare Registrar). The four roadmap layers — local dev, Git hosting, build and delivery, DNS — carry over unchanged. Put differently: if you only memorize the service names without internalizing the four layers, you’ll have to start over every time you move to a different service.
Closing
In the end, the fastest path to publishing a VuePress blog on a custom domain was to separate “where you write”, “where it’s stored”, “where it’s built”, and “where it’s served” into different layers, and clear them one at a time.
As of 2026 I don’t think many people are spinning up new VuePress 1.x builds. But the four-layer split — local, GitHub, build & delivery, DNS — is alive and well on an Astro + Cloudflare Pages stack today. The specific commands and screenshots age out, but the skeleton can be reused — I’m leaving this here as one example of that.
Related: VuePress/blog directory structure — a 2021 build note / Connecting an Onamae.com custom domain to Netlify / Deploying a VuePress / static site to Netlify